
How to Write a Dynamics 365 CE Plugin
In this article, I'll take you step-by-step through creating a Dynamics 365 CE Plugin from the ground up.
If you're already familiar with Dynamics 365 CE, the Power Platform, and the concept of Plugins but need a quick refresher on crafting one, you're in the right place.
To kick things off, we'll cover the prerequisites and setup, followed by a detailed walkthrough of an example Plugin, from coding to registration.
By the end of this guide, you'll have a fully functional and working Plugin.
Let's dive in!
Getting Started with Plugins: Prerequisites and Setup
Developing Plugins for Microsoft Dynamics CRM requires a solid foundation in several key areas. Before creating your first Plugin, ensure you have the necessary skills and tools in place.
Here's what you need to know and do to get started:
Object-Oriented Programming (OOP) Concepts: A fundamental understanding of OOP principles is essential. Plugins are developed using these principles, which include encapsulation, inheritance, and polymorphism, among others.
The C# Programming Language: Plugins for Dynamics CRM are primarily written in C#. A good grasp of C# and its syntax, data types, and error-handling mechanisms is crucial for successful Plugin development.
The NuGet Dependency and Package Manager: NuGet plays a significant role in managing the libraries and packages your Plugin might depend on. Familiarity with NuGet will simplify incorporating external libraries and maintaining your project.
Setting Up Your Development Environment
Before you can start writing your Plugin, you'll need to set up your development environment with the following:
.NET Framework SDK: Ensure you have the .NET Framework SDK installed, specifically version 4.6.2 or later. This SDK provides the necessary libraries and tools to develop, test, and deploy your Plugins.
Visual Studio: A robust integrated development environment (IDE) like Visual Studio is indispensable for Plugin development. We recommend using Visual Studio Professional or Enterprise 2022 for its comprehensive features tailored for developers. During the installation, include the "Desktop development with C#" workspace, which equips Visual Studio with all the necessary tools and libraries for developing desktop applications, including Dynamics CRM Plugins.
With the prerequisites met and your development environment ready, you can write your first Plugin for Dynamics 365 CE (CRM). The following sections will guide you through writing, signing, and registering your first Plugin.
An Example Plugin: Implementation to Registration
A Plugin moves through two stages: implementation and then registration. In the implementation stage, you write the code and logic for the Plugin. The registration stage is used to register the Plugin in Dynamics and hook it into the system and events that will trigger it.
The Plugin we will develop will be triggered by creating an Account record. The Plugin will create a Task activity that will remind the creator of the Account (End User that created the Account) to follow up one week later.
Implementing the Plugin
After completing the setup and prerequisites, open Visual Studio and create a new project with the class library type. Make sure you choose .NET Framework 4.6.2 as shown below:

Next, right-click on the project in Solution Explorer and select “Manage NuGet Packages”:

This will open the NuGet package manager’s view to manage dependencies for the project. Make sure to navigate over to the “Browse” tab.
This will allow us to install the library that Microsoft provides to aid in developing Plugins for Microsoft Dynamics. Search for Microsoft.CrmSdk.CoreAssemblies package and install it in the project:

After installing the library, go to Solution Explorer, rename the Class1.cs file to FollowUpPlugin.cs, and open it.
This class will contain the code and logic for the Plugin. Copy and paste the below code in the class:

Let’s walk through the different parts of the code:
The Plugin class implements IPlugin interface and implements the Execute method in it.
The ITracingService enables writing to the tracing log. You can see an example in the final catch block.
The IPluginExecutionContext provides access to the context for the event that executed the Plugin.
The code verifies that the context InputParameters includes the expected parameters for the CreateRequest that this Plugin will be registered for. The Entity passed to the request will be available if the Target property is present.
The IOrganizationServiceFactory interface provides access to a service variable that implements the IOrganizationService interface, which delivers the methods you will use to interact with the service to create the task.
The ID of the account being created is found in the context OutputParameters and set as the regardingobjectid lookup column for the task.
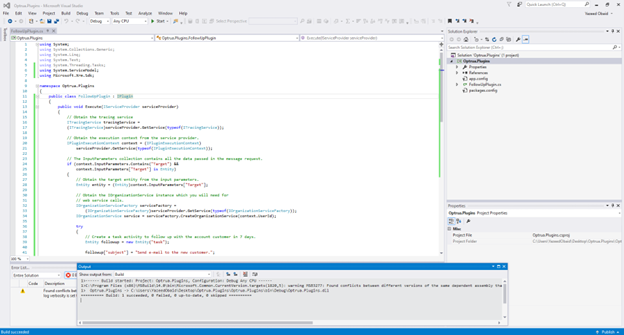
Now, let’s compile the project to ensure we don’t have any errors. Right-click on the project and select Build:

Monitor the output view and ensure that it succussed as shown below:
Now that the Plugin is ready, the final thing we need to do before moving to the registration stage is to sign the project. Microsoft only accepts signed projects.
To do that, right-click on the project, go to properties and signing tab as shown below:


In the Choose a Strong Name Key File dropdown, select <New…>. In the Create Strong Name Key dialog, enter a key file name and deselect the Protect My Key File with a password checkbox. Click OK to close the Create Strong Name Key dialog.

Save the changes and finally re-build the project again.
Registering the Plugin
Now that the Plugin is compiled and signed, we can register. To do that, you can either use the registration tool from Dynamics Developer SDK (not recommended) or use a community-managed tool called XrmToolBox.
We recommend using XrmToolBox because it provides more functionality and is easier to use.
Download and install XrmToolBox (www.xrmtoolbox.com) -- it's a free download. Just extract the zip file into a folder and run XrmToolBox.exe.
Then, create a connection to your environment as shown below:

Select “Connection Wizard” from this screen and enter the appropriate information for your environment.

Enter your environment name in place of “organization” in the Environment URL field shown above and click on next.

Enter the username (email address) and Dynamics 365 CE password and click on next to login.
After a successful connection is made to the environment, the below screen will display, and you can enter a friendly connection name and click on finish. This connection information can be used with the various tools that are part of XrmToolBox.

Now that we have the connection, we will install the “Plugin Registration” tool in XrmToolBox.
Note that the “Tools” tab in the main interface is not the same as the “Tool Library.” Choose "Open Tool Library" on the welcome page. This will list many different tools that you can install to help you.
Go to the Tool Library in XrmToolBox and search for “Plugin Registration”, as shown below.

Install the “Plugin Registration” tool. Finally, open the tool and select the connection you have created in the previous step.

The above image shows all the Plugins already registered in the environment.
To register your own Plugin, click “Register” in the top menu bar and select “Register new Assembly.” Then, navigate to the project location in File Explorer, and inside it, navigate to the following path: bin\\debug and find your compiled DLL file.

Select open and “Register Selected Plugins”:

Finally, we need to register a step to connect this Plugin to the Create Message for the Account table:

Click on “Register new Step,” and you are done. If you get a message about specifying attributes and performance, choose “no.” The Plugin is now registered and will be called whenever an Account record is created. As specified, the Plugin will create a follow-up task on the account record.
Conclusion
For this article, our goal has been to equip you with the knowledge to write your first Plugin, enhancing your Microsoft Dynamics 365 environment with tailored functionality.
We provided a quick, no-frills walk-through for creating a Microsoft Dynamics 365 Plugin. We started with Plugin prerequisites and then walked through the creation, signing, and registration processes.
Tons of additional background, reference information, and other tutorials are available on Microsoft Learn.
If you need extra support or want to enhance your team's skills, Optrua has got you covered. Specializing in Dynamics CRM and Power Platform with a commitment to Agile development, we deliver custom solutions for your specific business challenges. From new customizations to improving your Dynamics 365 setup, we provide the essential technical and development expertise to realize your objectives. Partner with us to turn your vision into reality.