


Welcome to Part 2 of my blog about transforming sales engagement with Copilot Studio and Dynamics 365 Sales. In this article, I demonstrate the application of Copilot Studio alongside Microsoft Power Automate and Dynamics 365 Sales.
Did you miss Part 1? You can read the blog here.
Streamlining Sales Processes
For this streamlined sales process, my scenario will use a fictitious company named Fabrikam Ironworks. Fabrikam Ironworks is a B2C company that manufactures Iron Doors, Gates and Railings - made to order. Their iron products come in a variety of different styles, including Classic, Traditional and Modern.
Fabrikam engages with clients through a combination of Internet sales and in-home sales consultations. They would like to deliver an on-demand, personalized sales experience to their online customers.
As a bonus, they would like to provide support to their field sales teams, who travel between customers’ homes all day and often run out of the correct sales collateral to help them win their in-person demos.
The solution is to build a custom internet-accessible Copilot ChatBot that can converse with users, understand their requests, capture actionable data, and respond to users with a tailored email message containing the correct product brochure. Sounds complex, but it is actually pretty straightforward with Microsoft Copilot Studio.
For this article, I will call our solution a “Lead Catcher.” I’m using a friendly interactive experience to provide the user with some valuable information (a personalized email and a product and style-specific brochure) while obtaining their contact information and additional buying intent information.
Let’s get started.
Lead Catcher: Work Breakdown
First, let me break down the necessary tasks into smaller, easy-to-achieve steps:
Copilot Studio Create a new Copilot
Topics: Create a friendly conversation path with Topics
Power Automate: Create Action with Power Automate
Engage Customer: Confirm the next steps with the customer
Before going directly into the software, I find it very helpful to map out the conversation flow.
For our example, my conversation flow looks like this:
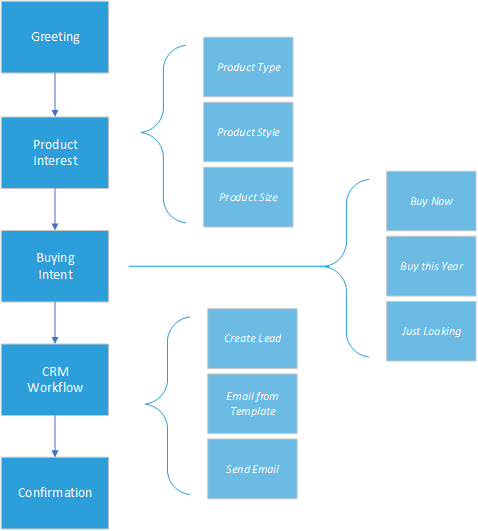
Each block on this diagram shows the different Topics that will be included in my Copilot. Topics are the different parts of the conversation where you want to accept user input and then provide some type of AI response or complete an action. For our flow, they are:
Greeting: Initial message welcoming new users and guiding them into the conversation.
Product Interest: User selects which Product Type, Product Style, and size they want.
Buying Intent: User indicates if they want to purchase now or just browse. This helps us identify follow-up activities.
CRM Workflow: Once we have all the inputs, this Topic hands the ball over to Power Automate.
Confirmation: Once all actions are complete, confirm the end of the conversation with the customer.
Now, with the planning and work breakdown complete, and once you have the appropriate software license, create a new Copilot by navigating to https://copilotstudio.microsoft.com/ and logging in.
Once logged in, you simply click “+ New copilot” as shown below:

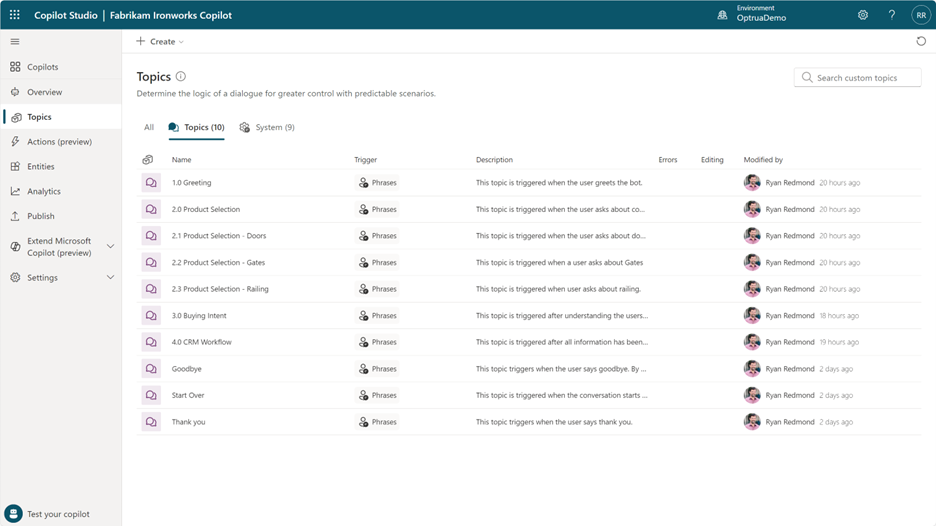
Following the work breakdown, create the Topics to match the conversation flow from the block diagram above.
Note that Topics can be triggered to start a new conversation or chained together in a modular fashion.
In our example, each Topic flows from one Topic to the next.
One Topic redirects to another to form the entire conversation. You could do all the steps in a single Topic, but I believe it is easier to understand and troubleshoot if you make them more modular.
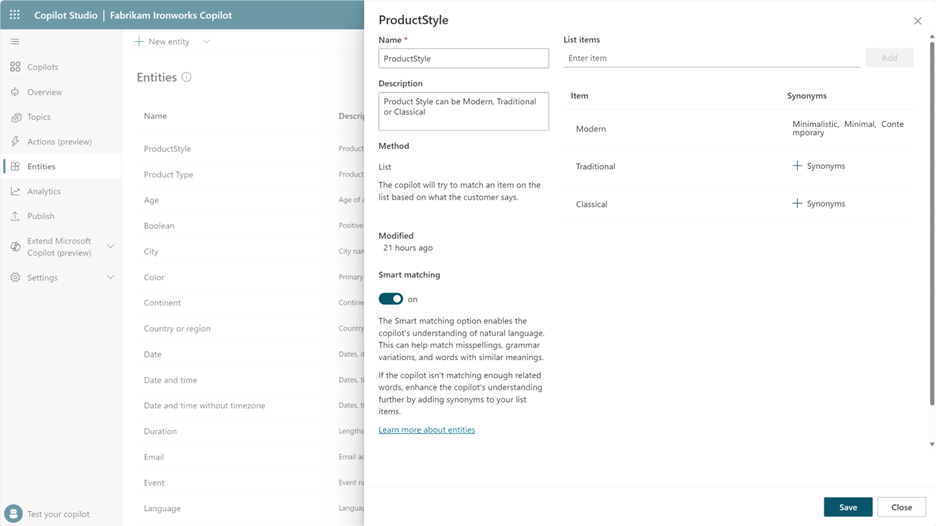
In addition to Topics, Entities are an important part of Copilot Studio. Entities are variables that can store parts of the conversation for later use.
In my example, I’m using Entities to capture the customer’s preferred Product Type (Door, Gate, Railing) and Product Style (Modern, Traditional, Classical) for use in Power Automate and Dynamics 365 Sales. The screenshot below shows the Entity definition for ProductStyle.
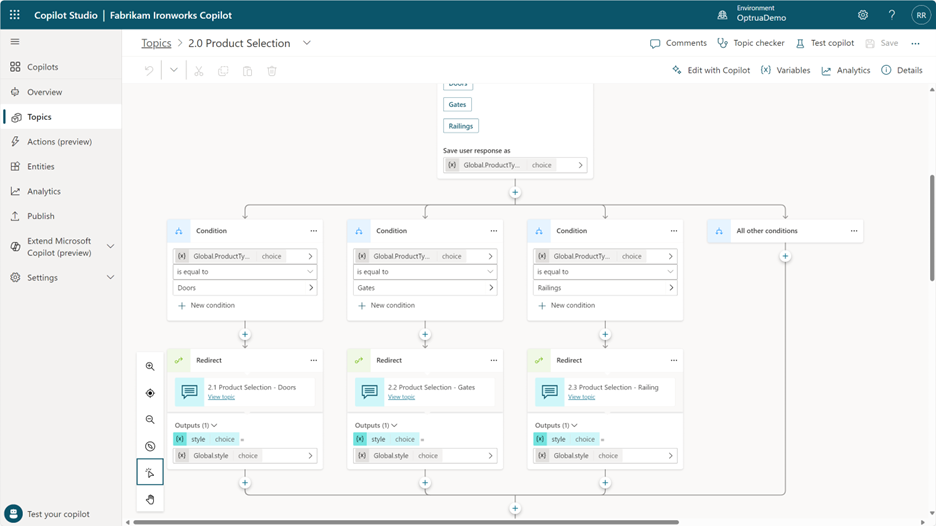
The screenshot below shows how this Entity is used inside the Product Selection Topic to capture the user input.
Note: Using generative AI, this approach captures the correct user input whether the user types “Door” or types out a full statement like “I would like to purchase a Door.”

The next step is to take the appropriate action based on the user’s input. The screenshot below shows conditional branching logic based on the Product Type. Then it redirects to another Topic to get additional information specific to the customer’s requested Product Type.
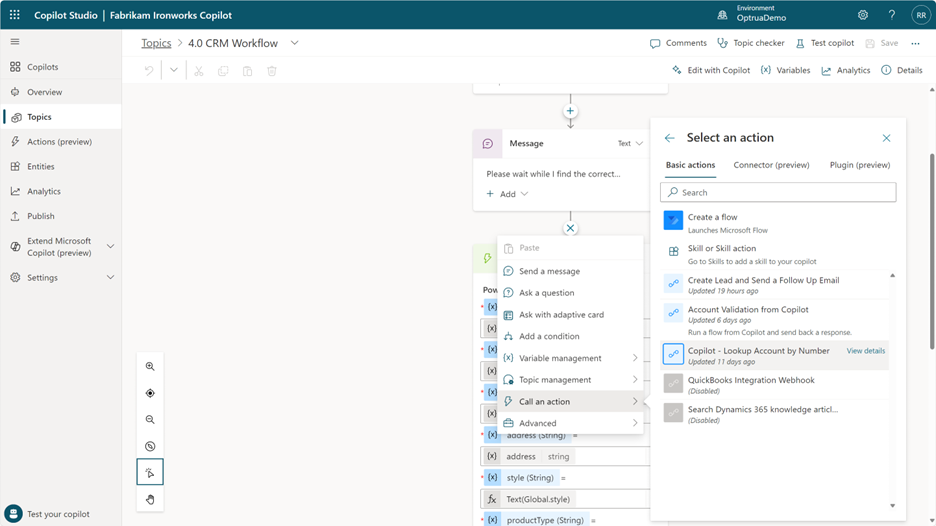
Once you have led the user through the conversation and captured important information into variables or entities, it’s time to step over to Power Automate.
This step may seem daunting; however, it is built into Copilot Studio.
Within our CRM Workflow Topic, I click the “+” to add a new node. Choose “Select an action” and then click “Create a flow”.
This will automatically launch Power Automate and populate the Start and End nodes within Power Automate. By clicking on the first node in the flow, you can see the collection of variables that are passed into Power Automate from Copilot Studio, as shown below.
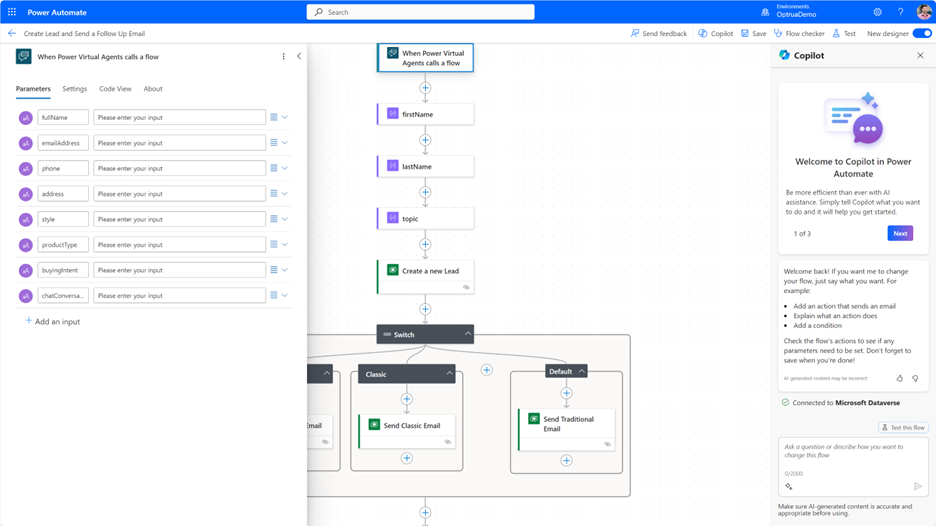
Now, within Power Automate, I’m using the Dataverse connector to connect to my instance of Dynamics 365 Sales. Earlier, inside Copilot Studio, I had asked the user to type in their Full Name; however, within Dynamics 365 Sales, this data is separated into First Name and Last Name. The screenshot below shows a few calculation nodes I use to manipulate data before sending it to Dynamics.

In this example, I’m using Power Automate to create a Dynamics 365 Sales lead with data from our Chatbot conversation. This new Dynamics 365 Lead contains nuanced and detailed information that would be very cumbersome to obtain through a traditional flat lead capture form, making this lead more actionable for your Sales Team.
Additionally, Power Automate uses Chatbot data to select the correct Email Template (matching the select Product and Style) from Dynamics 365 Sales and immediately sends the personalized email to the potential customer with the appropriate color brochure as an attachment.

The screen above shows the newly created Dynamics 365 lead “Mike Johnson” and the personalized email and attachment.
Conclusion
Copilot Studio is a new Microsoft tool that can bring the power of generative AI into your workflow.
Teaming it together with Power Automate’s workflow automation and over 1300 data connectors, along with the robust CRM capabilities of Dynamics 365 Sales, will give you unlimited ways to solve problems, streamline processes, and provide measurable time-saving value to your customers and users.
What do you want to build with Copilot Studio?
About the Author
Optrua specializes in optimizing Dynamics 365 CRM and Microsoft Power Platform to enhance customer experience and employee engagement. We're your partner in thriving amidst change using agile methods and continuous improvement.
We offer tailored solutions, including CRM, AI, system integration, analytics, and more, to help our clients grow and stay ahead of the competition.
Comments